
How to Automate Infographics With AI (From YouTube Videos)
Disclosure: some links in this post are affiliate links. If you buy through them I may earn a commission at no extra cost to you. I only recommend tools I actually use. Full disclosure.
The following guide shows how to Automate Infographics from your YouTube videos and post them to every social platform automatically.This is the exact workflow I built inside Make.com and use in production.
How to Automate Infographics with AI
Most tutorials on this topic either require Python skills or give you a list of tools with no workflow. Neither is useful if you want something running today.
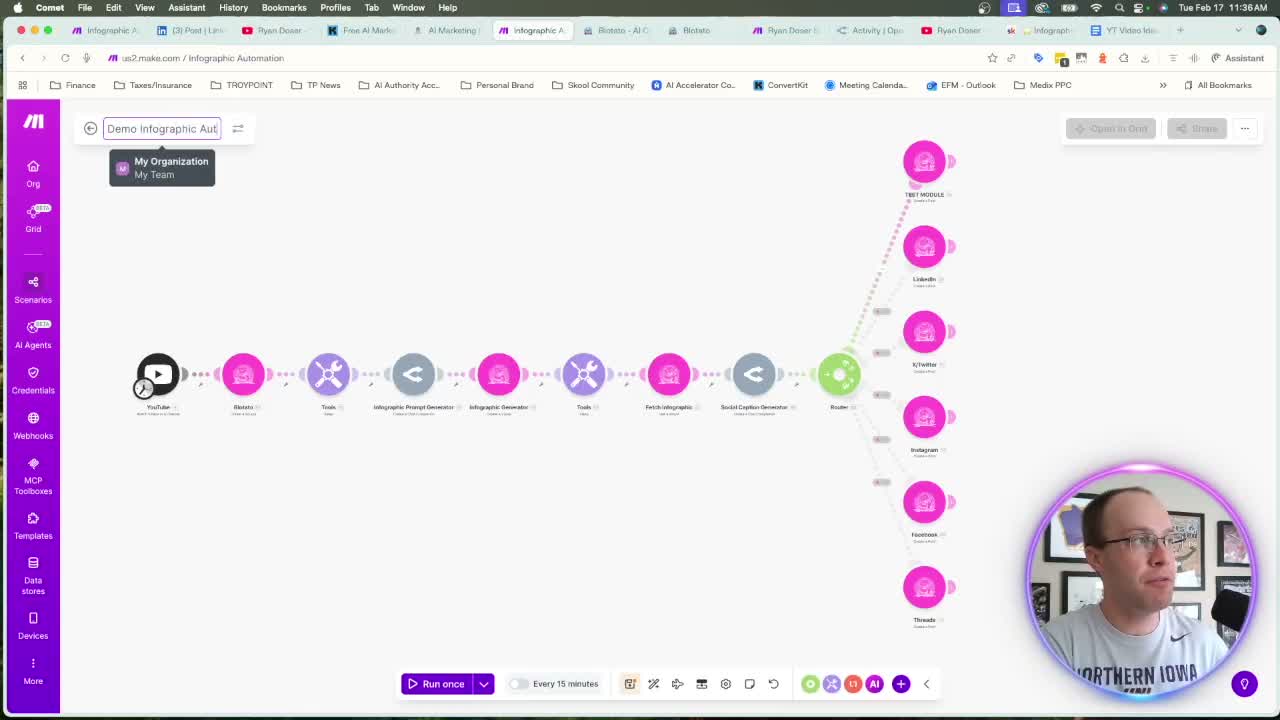
Here's what I built: a Make.com scenario that watches my YouTube channel, grabs the video transcript, generates a high-quality infographic prompt with AI, creates the infographic inside Blotato, writes a platform-specific social caption, and posts everything automatically across LinkedIn, X, Instagram, and Threads.
The setup costs under $30 a month in tools. Each run costs less than a penny in AI credits. That math is hard to argue with.
The Tool Stack for AI Infographic Automation
You only need three tools:
- Make.com (free to start): your automation platform. n8n and Zapier work too.
- Blotato ($29/month, 7-day trial): handles transcript fetching, infographic generation, and social posting via API.
- OpenRouter (pay-as-you-go): one API key for every major model. Add $5 to $10 in credits to start.
Most AI tools are a complete scam. Blotato at $29/month is the exception. The infographic quality, the API access, and the social integrations make it worth it. OpenRouter is the same: one key beats managing twelve.
Step-by-Step: Building the Infographic Automation
Step 1: Set Up the YouTube Trigger
In Make.com, start with a YouTube module. Connect your Google account and point it to your channel using the ID Finder. Set the limit to one video per run. This fires every time a new video publishes.
You're not limited to your own channel. Any YouTube channel works fine here.
Step 2: Fetch the Transcript with Blotato
The second module fetches the video transcript using Blotato's API. Set the source type to URL and map the video ID from the YouTube module into the URL field. Blotato handles the pull automatically.
Add a 5-second sleep module after this step. Blotato needs a moment to process before the next module reads the result. Skip it and the automation breaks.
Step 3: Generate the Infographic Prompt via OpenRouter
This module sends the transcript and video title to Claude Opus 4.5 via OpenRouter. A detailed system prompt tells the model how to structure an infographic prompt that gets strong visual output from Blotato.
You get this system prompt when you download my template. No writing from scratch needed.
Opus 4.5 costs less than one cent per run here. I checked my OpenRouter logs during testing: four runs on February 17th, each under a penny. Opus 4.6 is more capable, but for prompt generation at this scale, Opus 4.5 is the right call on cost.
Step 4: Generate the Infographic in Blotato
This module sends the generated prompt to Blotato's visual creation API. Select your preferred template from the dropdown. I use the whiteboard template. It produces clean, highly readable visuals that perform on LinkedIn and Instagram.
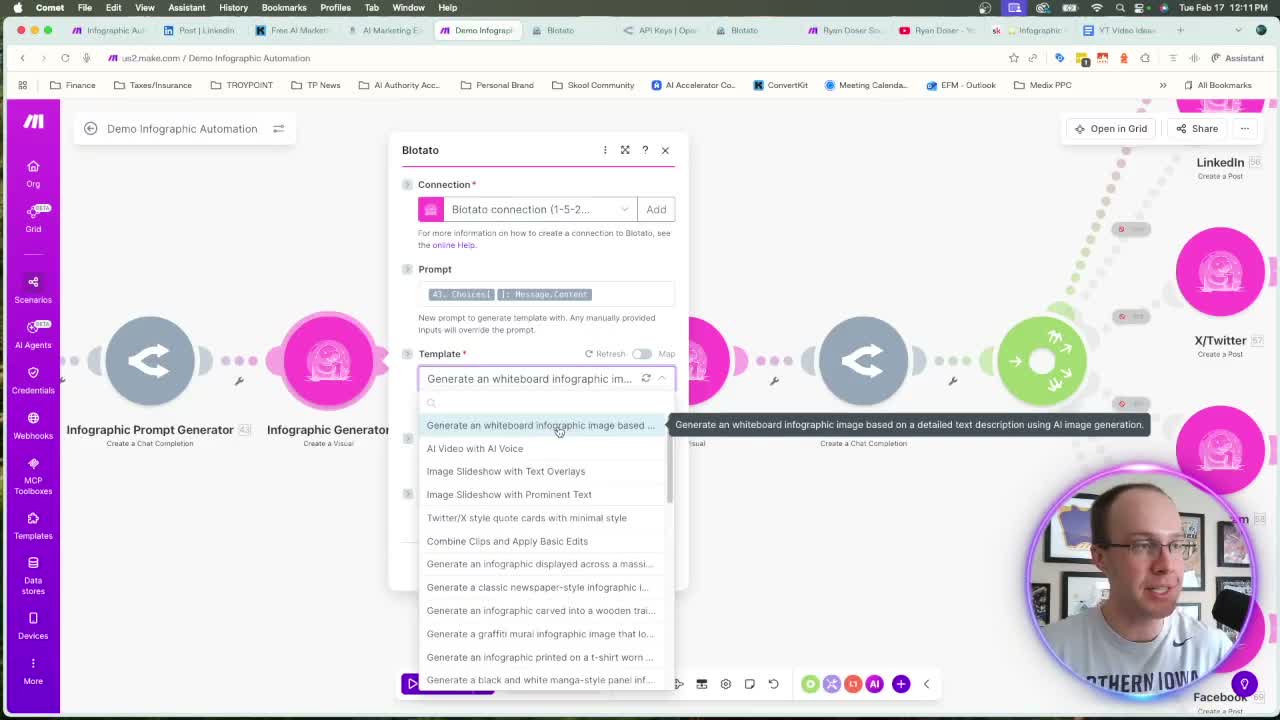
Blotato is actively expanding templates: newspaper, TV wall, constellation, graffiti, t-shirt, and more. Pick what fits your brand.
For the infographic description field, use the video title from your YouTube module. For the CTA text, write whatever action you want your audience to take. I use "Follow Ryan Doser for more AI tips."
Step 5: The 90-Second Sleep (Non-Negotiable)
After triggering the infographic generator, add a sleep module set to 90 seconds. Blotato needs that time to render the image. Shorten it and the fetch step fails because the image URL won't exist yet.
Step 6: Fetch the Finished Infographic and Generate a Caption
This module pulls the completed infographic URL from Blotato using the visual ID from the previous step. That URL is what gets posted to social media.
Step 7: Generate a Social Caption
Another OpenRouter module handles caption generation. Same setup as Step 3: system prompt with your brand voice, video title, and transcript, Opus 4.5 as the model. Customize the system prompt with your name and tone. Do not leave my name in there.
Step 8: Route and Post Across Platforms
A router module splits the workflow and posts to multiple platforms at once. Clone the posting module for each platform you want. Connect LinkedIn, X, Instagram, or Threads inside Blotato. Each module gets the same caption and infographic URL.
Test Before You Go Live
This is the step most people skip. Before running on your real accounts, set up a test route.
I use a LinkedIn company page with about 10 followers. Only that test route is active when I first run it. Live routes are disabled. If something outputs wrong, my audience never sees it. Once everything checks out in your Blotato dashboard and OpenRouter logs, enable the live routes.
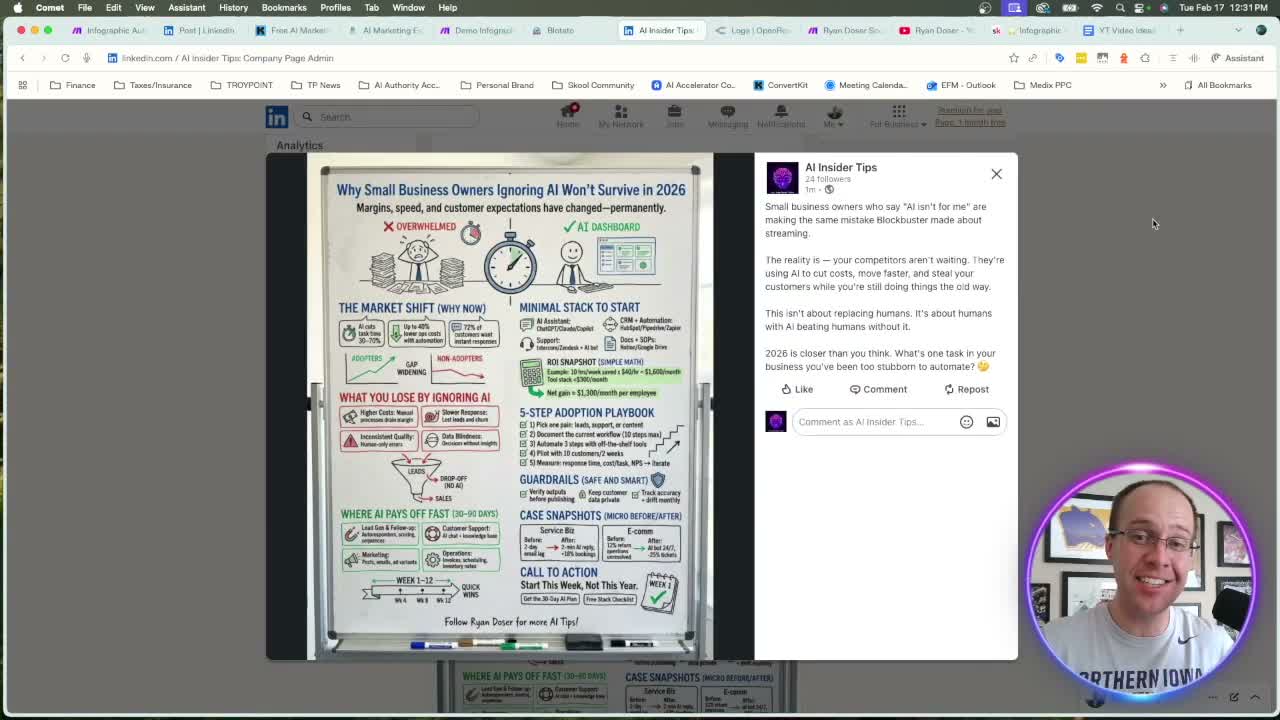
The whiteboard output for my podcast episode "Why Small Business Owners Ignoring AI Won't Survive" was accurate, well organized, and had no typos. The AI-written caption hook: "Small business owners who say AI isn't for me are making the same mistake Blockbuster made about streaming." Under a penny to produce that.
Ryan's Final Thoughts
The whole workflow is eight modules in Make.com, two paid tools, and under $30 a month. What you get is an infographic live on every platform the same day a video goes up. That's content repurposing on autopilot. If you want the same result without Make.com, my AI Content Engine runs it inside Claude or any AI tool from one video, graphics included, rendered in code with your brand colors.
As a reminder, you can get the free automation template inside my Free AI Marketing Guide.
Automate Infographics FAQs
How do I automate infographics from YouTube videos?
Use a Make.com scenario with a YouTube trigger, Blotato for transcript extraction and infographic generation, and OpenRouter for AI-generated prompts and captions. The automation fetches each new video's transcript, creates a custom infographic, and posts it to your social accounts. See the full breakdown above.
What tools do I need for AI infographic automation?
Make.com (free), Blotato ($29/month, 7-day trial), and OpenRouter (pay-as-you-go). Total monthly cost is under $35. Each run costs under one cent using Claude Opus 4.5 via OpenRouter.
Can I use n8n or Zapier instead of Make.com?
Yes. The same logic applies across any automation platform. Make.com is Ryan's preferred tool because it's free to start, but the Blotato and OpenRouter connections work the same way in n8n and Zapier.
How long does it take to generate an infographic automatically?
About two to three minutes per run. The 90-second sleep module accounts for most of that time. Blotato needs it to render the image before the fetch step can pull the URL.
What infographic templates does Blotato offer?
As of early 2026, Blotato offers whiteboard, newspaper, TV wall, constellation, graffiti, and t-shirt templates, with more being added over time. The whiteboard template produces the most readable, shareable visuals for LinkedIn and Instagram.